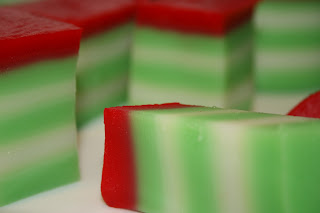
One very special Penang dish that I grew up eating as a kid is called Kuih Lapis or literally translated Layered Cake. It's has layers and layers of deliciously fragrant coconut flavoured goodness steamed to perfection. The layers look very thin yet one is able to peel back each individual layer and eat it bit by bit. I had not eaten it or even thought of it for years when a friend asked me if I knew of a Malaysian dessert that had lots of layers and was colourful and tasted like coconut jelly. I knew instantly she meant Kuih Lapis and went in search of a recipe. When I found Seasaltwithfood had a relatively easy recipe to follow and realised I had all the ingredients in my pantry I just had to try it for myself.
Now this is my very first attempt and although it does taste yummy and does look quite cute it's doesn't quite have the finish of a seasoned cook ... but then nor do I. The layers are meant to be very thin and not as fat as my layers but it's still nice and soft and sticky and gooey and most importantly - each layer can be rolled or peel one by one. I feel like a kid again. Here's a small taste of my childhood.
 |
| Pandan leaves - amazing flavour |
160g castor sugar
3 pandan leaves
200g rice four
6 tablespoons tapioca flour
1 x 400ml coconut cream
600ml water
1/8 teaspoon salt
food colouring ( I used green and red but go nuts, whatever you like)
1. In a small pan add water, sugar and pandan leaves (washed and knotted) and boil to make syrup. Once boiled let it simmer for about 10 minutes and then leave aside and let cool.
 2. Add all other ingredients in a big bowl and mix well. Then add cooled syrup and give batter a really good mix and then rest it for an hour.
3. After an hour strain batter. Then separate it into as many portions as you want colours. I did 2 portions, one was sprinkled with a little green and the other left white.
4. Get the steamer ready. If you have a big wok with steaming inserts to hold a big container like a baking dish then fabulous. My steamer could not hold my baking dish so I used several smaller ramekins. There are no rules, just whatever you can find that can be used to steam in works for me.
5. Add a think layer of coloured mixture and then steam for 6 minutes. Then add the other colour and steam for another 6 minutes. Make sure every time you open the lid to wipe down the top as beads of water would have formed from the steam and these droplets will drop onto the cake so wipe as much as you can away. Also give the batter a good mix before layering to make sure nothing has settled. Do this until you only have one layer left to go.


6. For the last layer you can add a few more drops of colouring to make the top layer stand out or in my case after steaming green and white layers I made the last layer bright red. Steam the last layer for 10 minutes and then leave cake to cool for at least 5 hours. I let mind cool on counter for 2 hours and then I put it in fridge overnight.

7. Only when it's set properly then cut into desired shapes.


No comments:
Post a Comment