Showing posts with label jelly. Show all posts

Saturday, 25 August 2012

Rosewater Stained Glass Jelly

A friend of mine showed me a post that the very clever people at The Food Librarian had on Broken Glass Jello. It is basically coloured jelly cut up and suspended in technicolor gorgeousness in white jelly. Very very simple, very very beautiful and definitely a hit with the kids. The original recipe is super easy as the technicolor jelly was just 4 packets of Jello in 4 different colours.

I did opt not to use the boxed Jello purely for the fact that if I made my own coloured jelly than the colouring and sugar content was in my control. The white jelly component is sugar laden enough as it's a whole can of condensed milk. I also wanted the coloured component to be rosewater flavoured as rosewater jelly is something that always makes me think of my childhood.

Whichever way you decide to go just know that the kids won't care as all they see is colour, colour and more colour and as quickly as you blink the pieces will disappear.

Stained Glass Jelly

1.2L water
6-10 tablespoons castor sugar (go with your taste buds)
2 teaspoons rosewater
4 tablespoons powder gelatin
300ml boiling water
food colouring (I used 4 colours but it's up to you how little or how many you want)

*** or completely ignore the last 6 lines and get 4 boxes of Jello ***

395ml sweetened condensed milk
1/2 cup cold water
1 1/2 cup boiling water
3 tablespoons gelatin power

1. Make jelly. If you are using Jello only use 1 cup water for each colour as you want the jelly a harder consistency and it sets faster. If not add water, sugar and rosewater to desired taste and let simmer. In a separate cup dissolve gelatin in hot water and stir through jelly mixture. Boil once and remove from fire.

2. Separate jelly into 4 containers and add food colouring. Cool in fridge. If possible overnight is preferred but if not as long as possible, 3 hours or more.

3. Once coloured jelly is ready cut into little blocks and mix it up in a container.

4. Dilute condensed milk with hot water. Dissolve gelatin in cold water and mix. Stir and let cool before adding to coloured jelly. If you add when milk jelly is still hot coloured jelly will start to melt. Set in fridge overnight.


Tuesday, 10 July 2012

Coconut Sugar Jelly

When my Mum visits from Malaysia I take full advantage of her amazing cooking skills and set her to work for my belly and my cravings for the duration of her stay. I suddenly go from Goddess of My Kitchen (it's my blog and I can call myself anything I wish) to a kid needing Mum's cooking and she never disappoints. Mummy's are amazing aren't they?

Tonight after a banquet for dinner which was followed by a luscious dessert I thought out loud "Mum, remember that coconut jelly you used to make" and without skipping a beat Mum starts on this delicious jelly - after we had all had pavlova mind you!! 

Now my Mum's way of cooking is never precise, always a dash of this, a pinch of that, a splash or 2 of something else so I have had to try to learn with my eyes and by tasting so this recipe is a flurry of note taking and me trying to sum up some measures as my amazing Mum Goddess does her pinch of this and drop of that.

For lovers of hard jelly (it's not of the wobbly ilk) and of the taste of coconut this is a must try. I love coconut in any shape or form so now that I know how to make this it will be on my repertoire of things to whip up when I want a taste of Malaysia. Delish!!

Coconut Sugar Jelly

1 packet of 40g agar-agar
2 strips of pandan leaves
250g of coconut sugar (palm sugar, gula melaka)
400ml coconut cream
2 big pinches of salt
1.5l water

1. Dissolve agar-agar in a pot with 1.25l water. Knot the pandan leaves together and leave them in the pot with agar-agar.


2. When most of the agar-agar is dissolved add the palm sugar and over a gentle flame slowly stir until all sugar is dissolved as well. Add salt.


3. Mix the coconut cream and approx 250ml water and then add to agar-agar solution and taste.
*** If you feel you may like a sweeter jelly add a tablespoon or 2 of castor sugar to taste.


4. Stir until everything looks well mixed and then let boil. Take mixture off the fire as soon as it reaches boiling point. Sieve once and pour coconut mixture into whatever mould you want.

5. Leave to set on kitchen top or fridge. The jelly will set quite fast compared to the wobbly ones as the agar-agar works a lot faster than gelatine. Our efforts tonight was not placed in the fridge at all for setting.

6. Once set use knife and cut everyone a slice and then give yourself a big spoon and shovel jelly in face!! YUM!


Thursday, 31 May 2012

Layers of Fun - Kuih Lapis

I am so very fortunate to have the life that I have. I spent the first 20 years of my life growing up on the wonderfully tropical and heavenly Penang Island in Malaysia and then Australia. Food on Penang is in my opinion second to none in terms of taste, variety, smells, textures and uniqueness due to the blend of cultures and races that call Penang home.
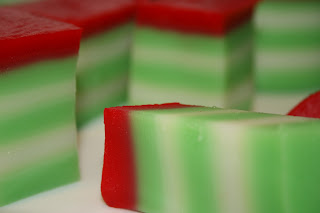
One very special Penang dish that I grew up eating as a kid is called Kuih Lapis or literally translated Layered Cake. It's has layers and layers of deliciously fragrant coconut flavoured goodness steamed to perfection. The layers look very thin yet one is able to peel back each individual layer and eat it bit  by bit. I had not eaten it or even thought of it for years when a friend asked me if I knew of a Malaysian dessert that had lots of layers and was colourful and tasted like coconut jelly. I knew instantly she meant Kuih Lapis and went in search of a recipe. When I found Seasaltwithfood had a relatively easy recipe to follow and realised I had all the ingredients in my pantry I just had to try it for myself.

Now this is my very first attempt and although it does taste yummy and does look quite cute it's doesn't quite have the finish of a seasoned cook ... but then nor do I. The layers are meant to be very thin and not as fat as my layers but it's still nice and soft and sticky and gooey and most importantly - each layer can be rolled or peel one by one. I feel like a kid again. Here's a small taste of my childhood.

Pandan leaves - amazing flavour
KUIH LAPIS

160g castor sugar
3 pandan leaves
200g rice four
6 tablespoons tapioca flour
1 x 400ml coconut cream
600ml water
1/8 teaspoon salt
food colouring ( I used green and red but go nuts, whatever you like)

1. In a small pan add water, sugar and pandan leaves (washed and knotted) and boil to make syrup. Once boiled let it simmer for about 10 minutes and then leave aside and let cool.

2. Add all other ingredients in a big bowl and mix well. Then add cooled syrup and give batter a really good mix and then rest it for an hour.

3. After an hour strain batter. Then separate it into as many portions as you want colours. I did 2 portions, one was sprinkled with a little green and the other left white.

4. Get the steamer ready. If you have a big wok with steaming inserts to hold a big container like a baking dish then fabulous. My steamer could not hold my baking dish so I used several smaller ramekins. There are no rules, just whatever you can find that can be used to steam in works for me.

5. Add a think layer of coloured mixture and then steam for 6 minutes. Then add the other colour and steam for another 6 minutes. Make sure every time you open the lid to wipe down the top as beads of water would have formed from the steam and these droplets will drop onto the cake so wipe as much as you can away. Also give the batter a good mix before layering to make sure nothing has settled. Do this until you only have one layer left to go.


 6. For the last layer you can add a few more drops of colouring to make the top layer stand out or in my case after steaming green and white layers I made the last layer bright red. Steam the last layer for 10 minutes and then leave cake to cool for at least 5 hours. I let mind cool on counter for 2 hours and then I put it in fridge overnight.

7. Only when it's set properly then cut into desired shapes.


Thursday, 24 May 2012

Rainbow - just add water

 
It's twin playgroup day again and that means making something to share with my fabulous twinnies family. I was going to make a Malteser Slice but didn't get to the shops as the weather has been apocalyptic. I know, I know, rain and storm should not stop one from buying Maltesers, shame on me. So I had to get inspiration from my pantry and lo and behold I had 5 different colours of packet jelly crystals. I had seen a photo of colourful jelly made in hollowed oranges and since my fruit basket had loads of orange fresh from the market I knew I just had to give this rainbow jelly a try.

Now I must stress, the degree of difficulty for this dish is 2 or out 10. Try not to break a sweat.Not for the actual jelly making as you just fo llow the steps on the packet but for the hollowing out of the oranges. A little tricky but after the first 1 or 2 you'll get the hang of it and it becomes a breeze.  I love easy recipes with instant wow effect.

This is not an original recipe, just type jello wedges in Google and you'll see hundreds of examples but it was the first for me. And after weeks of hardly seeing the sun, being pelted by heavy rain and blown away by gale forced winds I thought it was time for a rainbow .... out of a packet or otherwise.

Rainbow Jelly 

10 oranges
5 x packet of coloured jelly crystals

1. Use a sharp knife to hollow out the oranges

2. Do it over a bowl to collect the juices and keep segments for other recipes, juicing or simply to eat.

3. Follow instructions on jelly packet. I used 5 different colours and flavours.

4. Place in orange moulds and chill according to packet instructions.
** I made 1 colour in 2 halves and put the balance in a separate mould**

5. Slice with a sharp knife as a blunt one will make cutting into the orange skin difficult and you'll potentially ruin the jelly.

6. Serve to your kids and their friends, wait for 10 minutes, sit back and watch all that colouring take effect and think "surely those aren't my kids?"