Showing posts with label kids. Show all posts

Thursday, 18 October 2012

Ice Cream Cone Cupcakes


Here's another recipe with an extremely low degree of difficulty but the wow impact is maximum. Every body loves a cupcake, everybody loves an ice cream cone. So why not put the 2 together to bedazzle the kids.

This is by no means an original idea of yours truly. I can not remember exactly where I got the inspiration from but there's a gazillion examples on the net. Once again I had very little time to make something for our gorgeous twin friends so I went for my party trick of little effort for maximum impact. Everything came out of a box, just a matter of putting it together. Here's how I did it.

Ice Cream Cone Cupcakes

1 x cupcake mix (any brand, I used Greens)
1 x tub of vanilla frosting
24 flat bottom ice cream cones
whatever topping or sprinkle you like

**** of course if you want to avoid premix cake mix then knock yourself out making any cake base you like and butter icing works best for consistency ****

1. Take a piece of foil and cover 2 muffin trays. Make a small slit over each muffin hole and place ice cream cone in. This is done to stabilise the cone as it can fall if cake batter shifts too much in the baking process.

2. Mix cupcake mix according to directions on box.

3. Fill cone up to 2/3 full. Any more and the cake will over flow and look more like a melting ice cream cone.

4. Bake for 20-25 minutes in a preheated 180 degrees oven. Remove to cool.

5. Take a sharp knife and make a small hole at the bottom of the cone.This will help release some steam and keep cone crisp for longer.

6. Fill a pipping bag with your favourite icing and pipe. I used a star nozzle on some and also a plain nozzle on the others just for the different finish.

7. Decorate with sprinkles.

8. Watch the children's faces when they bite into it thinking it's real ice cream!!


Wednesday, 10 October 2012

Spiderman Cake


My little Big Boys have turned 3 years old. Celebrations all round!! Of course I wanted to bake their birthday cake so I asked them what they wanted. My boys are really into all things superhero at the moment and the superhero du jour is Spiderman so they wanted a Spiderman Cake.

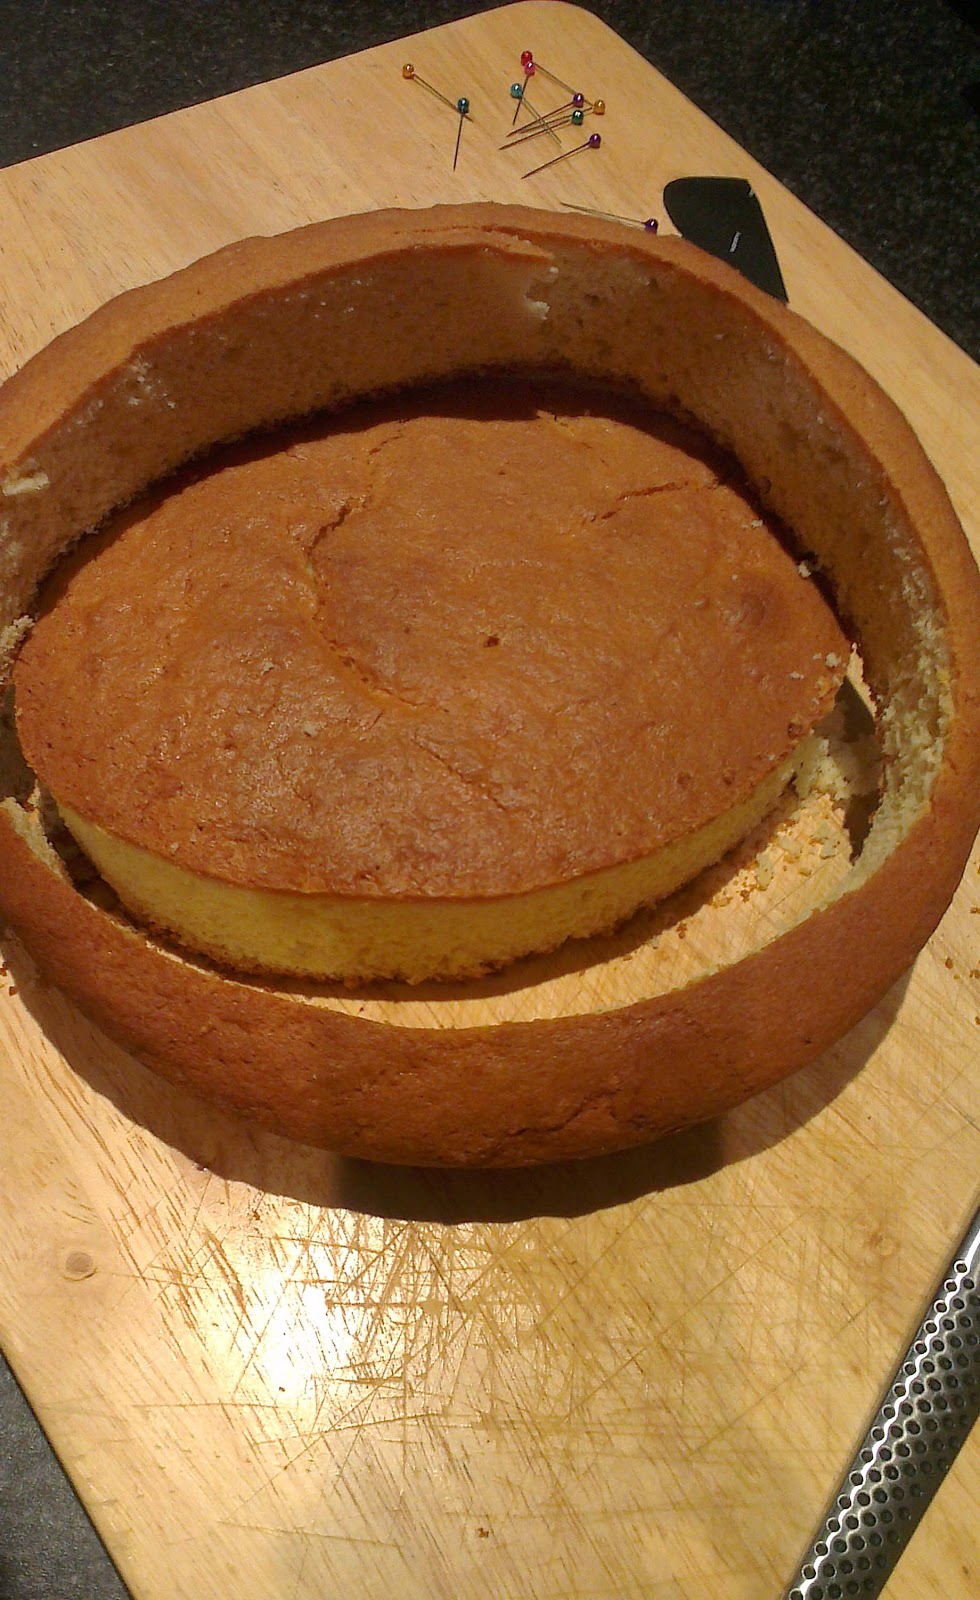
I panicked at first but once the challenge was accepted by me I set out to find the easiest way I could make something that resembled our friendly neighbourhood Spiderman. The answer was very obvious, just make the face and get the colours right and tadaah ... a superhero cake.

The plan was to use fondant on the whole cake and then just fill in the web and eye details. Alas all good plans can come unhinged. I have not worked with fondant successfully EVER and this time was no different. I didn't have enough for the size of my cake and rolled it too thin and then I couldn't get it back off the rolled surfaced and when I did get some off it was sticky and broken and just awful. So I opted to just make a fondant top of cake and ice the sides that way I could get a thick enough fondant base that would not be stuck to the surface. Because I did not have ingredients to whip up a batch of icing (nor did I have the will as it was almost 10pm at that stage) I used store bought Betty Crocker's vanilla icing .. yum yum yum!

Here's what I made.

Spiderman Cake

1 round butter cake (approx 8.5 inches)
1 pack store bought ready to roll fondant
1 tube of Wilton's black icing
1 tub of Betty Crocker's vanilla icing
red gel colouring
blue liquid colouring

1. Draw a template of Spidey's face and pin on cake. Then neatly cut the shape out.

2. Ice the cut cake with a layer of icing. Not too thick as it's there mainly to help hold the fondant in place.

3. Use red gel colouring on fondant until you get the colour you want. Then cut Spidey's face out and place on top of cake.

4. Use a small tip needle or stick to trace the lines for eyes and web.

5. Fill in the blanks with the black icing. Either fit a small plain nozzle at the end of tube or put black icing in a pipping bag.

6. Make the icing for the side of cake blue. Then pipe to cover the sides.

7. Watch the excitement on the faces of the kids when you show them for the first time their Spiderman cake ... and then watch in horror as they stick their fingers into the blue icing almost immediately "just to taste" your efforts.


Saturday, 25 August 2012

Rosewater Stained Glass Jelly

A friend of mine showed me a post that the very clever people at The Food Librarian had on Broken Glass Jello. It is basically coloured jelly cut up and suspended in technicolor gorgeousness in white jelly. Very very simple, very very beautiful and definitely a hit with the kids. The original recipe is super easy as the technicolor jelly was just 4 packets of Jello in 4 different colours.

I did opt not to use the boxed Jello purely for the fact that if I made my own coloured jelly than the colouring and sugar content was in my control. The white jelly component is sugar laden enough as it's a whole can of condensed milk. I also wanted the coloured component to be rosewater flavoured as rosewater jelly is something that always makes me think of my childhood.

Whichever way you decide to go just know that the kids won't care as all they see is colour, colour and more colour and as quickly as you blink the pieces will disappear.

Stained Glass Jelly

1.2L water
6-10 tablespoons castor sugar (go with your taste buds)
2 teaspoons rosewater
4 tablespoons powder gelatin
300ml boiling water
food colouring (I used 4 colours but it's up to you how little or how many you want)

*** or completely ignore the last 6 lines and get 4 boxes of Jello ***

395ml sweetened condensed milk
1/2 cup cold water
1 1/2 cup boiling water
3 tablespoons gelatin power

1. Make jelly. If you are using Jello only use 1 cup water for each colour as you want the jelly a harder consistency and it sets faster. If not add water, sugar and rosewater to desired taste and let simmer. In a separate cup dissolve gelatin in hot water and stir through jelly mixture. Boil once and remove from fire.

2. Separate jelly into 4 containers and add food colouring. Cool in fridge. If possible overnight is preferred but if not as long as possible, 3 hours or more.

3. Once coloured jelly is ready cut into little blocks and mix it up in a container.

4. Dilute condensed milk with hot water. Dissolve gelatin in cold water and mix. Stir and let cool before adding to coloured jelly. If you add when milk jelly is still hot coloured jelly will start to melt. Set in fridge overnight.


Saturday, 4 August 2012

Strawberry Custard Tarts

It was twin playgroup time again and I was tossing up between making either this or cookie pops. After a rather hectic week and not really wanting to load the twins into the car and drag them (or rather them drag me) through the shops for 1 item I made these tarts. Always fun to make and certainly a winner among the kids. They just love anything with strawberry in it. Also the price of strawberries are coming back down again so I had several punnets just looking fat and sweet calling at me "eat me, eat me". You only have to tell me once.

The recipe that I used is from Taste.com.au with a little tweak. I doubled the custard ingredients as the original recipe only made enough custard for 12 mini store bought pastry cases and I wanted more. Also I made my own tart cases. I did not make the pastry from scratch but by all means if you can please do. I used ready made shortcrust pastry and also some dark chocolate shortcrust pastry. Here's a thing I learnt from using the chocolate pastry - taste SO crazily yummy as is without baking. All the remnants from the cut outs ... ate them :)

Strawberry Custard Tarts
3 sheets shortcrust pastry (I used 2 normal, 1 chocolate just because I could)
4 egg yolks
4 tablespoons caster sugar
2/3 cups thickened cream
strawberry jam
1 punnet strawberries

1. Preheat oven to 180 degrees.
2. Cut out pastry and shape into muffin trays. I made 24 minis and 6 large muffin size ones.
3. Dock the pastry by piercing it with a fork several times so that it doesn't rise and get too puffy or you won't have room for lots of custard.
4. Bake in oven for 10 minutes, set aside to cool and start on custard.
*** pastry will shrink a little when baked so when you cut out pastry to make tart cases do not cut out pieces that are too small ***
5. Whisk yolks and sugar until all sugar is dissolved. Then add cream and mix. Don't whisk too much or the final product will be bubbly and not smooth.
6. Put a small dollop of jam on the base of each tart and add a piece of strawberry. How big the piece of fruit is up to you and also it has to fit the size of tart.
7. Pour custard into tart case around the strawberry and try not to overfill.
8. Bake for approx 15 minutes until custard is set.


Friday, 8 June 2012

Pie pops - stick it on a stick

I have learnt judging from the my kid's and their friend's expressions that anything you stick on a stick is instantly agreeable and extra delicious. When I decided to try my hand at pie pops I took inspiration from the very creative and clever people at Luxirare and Bakerella.

I must admit that I my first attempt was rather dismal. I made pecanamel (pecan and caramel for those of you who use real English) pie pops. The filling was really delicious but my crimping abilities to seal the pies left a lot to be desired for as all the caramel oozed out of the pies and left me with little cushiony pastry with dry nuts in it. Big apologies to my dear friend Jo who was my taste tester, I sent her home with a few samples for the family. Sorry!!

The next day I was adamant that I was going to do better and make pie pops that would not ooze filling at all and I am so please to say that I succeeded. I realised where I went wrong and rectified the problem. I was not sealing the edges well enough and making them in too much of a hurry so I slowed down and paid more attention and it worked a charm. This time I made 2 more fillings for variety. I made some bananamel (banana and caramel) pies and also some Nutella ones. I made them for our fortnightly gathering of twins at playgroup and I can happily say the children enjoyed the Nutella ones and the Mum's the banana ones as I had a bowl of caramel sauce for extra drizzle.

Pie Pops

6 sheets of puff or shortcrust pastry - I used store bought
about 30 lollipop sticks ( 6 inches )
1 egg beaten with a little water or milk (for egg wash)

Pecan caramel filling
3 handfuls of pecan nuts chopped
4-5 tablespoons of caramel sauce


Banana caramel filling
1 large banana mashed
3-4 tablespoons of caramel sauce


Nutella filling

4 tablespoons Nutella
3 tablespoons icing sugar


1. To make pecan filling simple chop pecans and stir caramel sauce through.

2. To make banana filling is just as easy, just mix banana and caramel.

3. Nutella filling not as easy, still easy though. Mix Nutella and icing sugar. Rolled into a log and wrap in plastic and freeze for about half hour. Then cut disc of Nutella when ready for pies as it's easier to work with when it's cold and hard.

4. Use cookie cutter and punch out circles. A sheet of pastry should yield about 9-10 circles.

5. Place circles on parchment paper and place lollipop sticks on to about middle of circle. Spoon filling on but do not overfill.

6. Dip finger in water and run along the edge of circle and place another circle on top and seal. (this is where I went wrong the first time, did not seal with water and overfilled pies)

To make life easier I would cut all circles out, then do each step in bulk instead of making one complete pie as it takes up more time I think.


7. Once sealed properly use the end on a lollipop stick and press down along the edge to form a nice pattern. You could use a fork if you prefer. Brush with egg wash.

8. Bake in 180 degrees oven for about 15 minutes or until pies are puffy and golden brown.


Thursday, 31 May 2012

Layers of Fun - Kuih Lapis

I am so very fortunate to have the life that I have. I spent the first 20 years of my life growing up on the wonderfully tropical and heavenly Penang Island in Malaysia and then Australia. Food on Penang is in my opinion second to none in terms of taste, variety, smells, textures and uniqueness due to the blend of cultures and races that call Penang home.
One very special Penang dish that I grew up eating as a kid is called Kuih Lapis or literally translated Layered Cake. It's has layers and layers of deliciously fragrant coconut flavoured goodness steamed to perfection. The layers look very thin yet one is able to peel back each individual layer and eat it bit  by bit. I had not eaten it or even thought of it for years when a friend asked me if I knew of a Malaysian dessert that had lots of layers and was colourful and tasted like coconut jelly. I knew instantly she meant Kuih Lapis and went in search of a recipe. When I found Seasaltwithfood had a relatively easy recipe to follow and realised I had all the ingredients in my pantry I just had to try it for myself.

Now this is my very first attempt and although it does taste yummy and does look quite cute it's doesn't quite have the finish of a seasoned cook ... but then nor do I. The layers are meant to be very thin and not as fat as my layers but it's still nice and soft and sticky and gooey and most importantly - each layer can be rolled or peel one by one. I feel like a kid again. Here's a small taste of my childhood.

Pandan leaves - amazing flavour
KUIH LAPIS

160g castor sugar
3 pandan leaves
200g rice four
6 tablespoons tapioca flour
1 x 400ml coconut cream
600ml water
1/8 teaspoon salt
food colouring ( I used green and red but go nuts, whatever you like)

1. In a small pan add water, sugar and pandan leaves (washed and knotted) and boil to make syrup. Once boiled let it simmer for about 10 minutes and then leave aside and let cool.

2. Add all other ingredients in a big bowl and mix well. Then add cooled syrup and give batter a really good mix and then rest it for an hour.

3. After an hour strain batter. Then separate it into as many portions as you want colours. I did 2 portions, one was sprinkled with a little green and the other left white.

4. Get the steamer ready. If you have a big wok with steaming inserts to hold a big container like a baking dish then fabulous. My steamer could not hold my baking dish so I used several smaller ramekins. There are no rules, just whatever you can find that can be used to steam in works for me.

5. Add a think layer of coloured mixture and then steam for 6 minutes. Then add the other colour and steam for another 6 minutes. Make sure every time you open the lid to wipe down the top as beads of water would have formed from the steam and these droplets will drop onto the cake so wipe as much as you can away. Also give the batter a good mix before layering to make sure nothing has settled. Do this until you only have one layer left to go.


 6. For the last layer you can add a few more drops of colouring to make the top layer stand out or in my case after steaming green and white layers I made the last layer bright red. Steam the last layer for 10 minutes and then leave cake to cool for at least 5 hours. I let mind cool on counter for 2 hours and then I put it in fridge overnight.

7. Only when it's set properly then cut into desired shapes.