Thursday 31 May 2012

Layers of Fun - Kuih Lapis

I am so very fortunate to have the life that I have. I spent the first 20 years of my life growing up on the wonderfully tropical and heavenly Penang Island in Malaysia and then Australia. Food on Penang is in my opinion second to none in terms of taste, variety, smells, textures and uniqueness due to the blend of cultures and races that call Penang home.
One very special Penang dish that I grew up eating as a kid is called Kuih Lapis or literally translated Layered Cake. It's has layers and layers of deliciously fragrant coconut flavoured goodness steamed to perfection. The layers look very thin yet one is able to peel back each individual layer and eat it bit  by bit. I had not eaten it or even thought of it for years when a friend asked me if I knew of a Malaysian dessert that had lots of layers and was colourful and tasted like coconut jelly. I knew instantly she meant Kuih Lapis and went in search of a recipe. When I found Seasaltwithfood had a relatively easy recipe to follow and realised I had all the ingredients in my pantry I just had to try it for myself.

Now this is my very first attempt and although it does taste yummy and does look quite cute it's doesn't quite have the finish of a seasoned cook ... but then nor do I. The layers are meant to be very thin and not as fat as my layers but it's still nice and soft and sticky and gooey and most importantly - each layer can be rolled or peel one by one. I feel like a kid again. Here's a small taste of my childhood.

Pandan leaves - amazing flavour
KUIH LAPIS

160g castor sugar
3 pandan leaves
200g rice four
6 tablespoons tapioca flour
1 x 400ml coconut cream
600ml water
1/8 teaspoon salt
food colouring ( I used green and red but go nuts, whatever you like)

1. In a small pan add water, sugar and pandan leaves (washed and knotted) and boil to make syrup. Once boiled let it simmer for about 10 minutes and then leave aside and let cool.

2. Add all other ingredients in a big bowl and mix well. Then add cooled syrup and give batter a really good mix and then rest it for an hour.

3. After an hour strain batter. Then separate it into as many portions as you want colours. I did 2 portions, one was sprinkled with a little green and the other left white.

4. Get the steamer ready. If you have a big wok with steaming inserts to hold a big container like a baking dish then fabulous. My steamer could not hold my baking dish so I used several smaller ramekins. There are no rules, just whatever you can find that can be used to steam in works for me.

5. Add a think layer of coloured mixture and then steam for 6 minutes. Then add the other colour and steam for another 6 minutes. Make sure every time you open the lid to wipe down the top as beads of water would have formed from the steam and these droplets will drop onto the cake so wipe as much as you can away. Also give the batter a good mix before layering to make sure nothing has settled. Do this until you only have one layer left to go.


 6. For the last layer you can add a few more drops of colouring to make the top layer stand out or in my case after steaming green and white layers I made the last layer bright red. Steam the last layer for 10 minutes and then leave cake to cool for at least 5 hours. I let mind cool on counter for 2 hours and then I put it in fridge overnight.
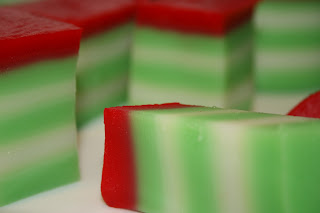
7. Only when it's set properly then cut into desired shapes.


Thursday 24 May 2012

Rainbow - just add water

 
It's twin playgroup day again and that means making something to share with my fabulous twinnies family. I was going to make a Malteser Slice but didn't get to the shops as the weather has been apocalyptic. I know, I know, rain and storm should not stop one from buying Maltesers, shame on me. So I had to get inspiration from my pantry and lo and behold I had 5 different colours of packet jelly crystals. I had seen a photo of colourful jelly made in hollowed oranges and since my fruit basket had loads of orange fresh from the market I knew I just had to give this rainbow jelly a try.

Now I must stress, the degree of difficulty for this dish is 2 or out 10. Try not to break a sweat.Not for the actual jelly making as you just fo llow the steps on the packet but for the hollowing out of the oranges. A little tricky but after the first 1 or 2 you'll get the hang of it and it becomes a breeze.  I love easy recipes with instant wow effect.

This is not an original recipe, just type jello wedges in Google and you'll see hundreds of examples but it was the first for me. And after weeks of hardly seeing the sun, being pelted by heavy rain and blown away by gale forced winds I thought it was time for a rainbow .... out of a packet or otherwise.

Rainbow Jelly 

10 oranges
5 x packet of coloured jelly crystals

1. Use a sharp knife to hollow out the oranges

2. Do it over a bowl to collect the juices and keep segments for other recipes, juicing or simply to eat.

3. Follow instructions on jelly packet. I used 5 different colours and flavours.

4. Place in orange moulds and chill according to packet instructions.
** I made 1 colour in 2 halves and put the balance in a separate mould**

5. Slice with a sharp knife as a blunt one will make cutting into the orange skin difficult and you'll potentially ruin the jelly.

6. Serve to your kids and their friends, wait for 10 minutes, sit back and watch all that colouring take effect and think "surely those aren't my kids?"


Tuesday 22 May 2012

Potty About Pie

Every now and then a certain dish will pop in my head and I'll start fantasizing about the taste, the smell, the wonderful textures blah blah blah and no matter what I do I can not shake it until I eat it. The dish that's stuck in my head today is Chicken Pot Pie.

It's a terribly cold and miserable day outside and the best remedy I can think of to counter the drab is to make some fresh hot pies. I love love love making pies, have never really been a fan of eating them (store bought ones) but I do enjoy the odd one or 2 homemade ones. I don't make them often which I should really as my husband loves a good pie or 3 and so do the kids. Well, the kids love the crust as they think scrunching pastry up and letting it crumble to the floor for the dog is fun. I love that the kids love it because it's pack full of vegetable goodness. If you use your own made stock and have controlled the salt content than it's even healthier still, but if you don't a little stock cube now and then doesn't hurt.

 Chicken Pot Pie

5 chicken thighs
3 leeks
2-3 celery sticks
1 onion
3 cloves garlic
3 carrots
1 large red capsicum
handful of parsley
2 tablespoons plain flour
1.5 cup of chicken stock
1 cup parmesan cheese (optional)
puff pastry sheets (I used store bought but if you are a goddess of kitchen and time, please make your own - then send me some)
egg wash (1 egg with a little water or milk whisked for brushing on pastry)

1. Cut vegetables to your liking, you can dice it all or leave it chunky, up to you. I have sliced them to about 3cm wide, whatever you feel like really. Cook all vegetables except capsicum in olive oil until it's cooked down and starts to caramelised. Then add chicken that has been sliced and cook for a further 5 minutes.

2. Add flour and cook for another 2 minutes. Then add stock, parsley, capsicum and let simmer. The mixture will thicken. Season with salt and pepper to taste. Let cool slightly.

3. Place in either one big dish for a family size pie or what I did was make 6 serves out of the mix. 3 were put in large single ramekins, 2 into smaller ones (kiddie size) and 1 into a bowl and immediately into my mouth.

4. I like to sprinkle a thin layer of parmesan on top of mix before pastry goes on. This is optional of course. With or without cheese, place puff pastry on top of pie dish, brush with egg wash and pop in oven. Preheated 200 degrees approx 20 minutes or until pastry has puffed and looking golden.


Friday 18 May 2012

When No Reason is Reason Enough


For a lot of people dessert is only partook when a celebration is being shared. I bet you those people are a lot smaller than I am!! I do try to limit my partaking of sweet things but because I just love cooking and baking so so much sometimes it's hard. I am my own worse enemy.

Tonight is a good example of this. My family and I went out for a lovely dinner, a 2 course meal that was so generous in servings that when dessert came around we all very quickly shook our heads and politely lied to the waiter that we could not possibly fit another mouthful in. No sooner had we left the restaurant that I started thinking, "sure I'm full now but in an hour or so surely I'll be looking for a little chocolate fix".

Which brings me to now, an hour and half after returning from dinner .... I have just removed 4 cups of Chocolate Hot Pots from the oven, hot pots that were inspired by none other than the Goddess of all things chocolaty and hot, Nigella. To be specific her Chocohotopots. My kitchen smells divine, of butter and dark chocolate. It's a very cold night and I am in need of some warmth and this is a lip smacking hot dessert so excuse me while I go and indulge *sigh*

Chocolate Hot Pots
125g butter
125g dark chocolate - I used 70% cocoa solids
2 eggs
3/4 cup caster sugar
3 tablespoons plain flour

1. Preheat oven to 200 degrees.

2. Melt butter and chocolate over double boiler or use microwave. (I used the microwave as I didn't want to wash up too many extra dishes .. lazy I know)

3. Allow chocolate mixture to cool.

4. Whisk egg, sugar and flour. Stir in cooled chocolate mixture and combine. (important that it's cooled or you'll end up with chocolate scrambled eggs)

5. Separate into 4 equal parts in ramekin - or if you're like me one will have a tad more than the others, just for me.

6. Bake in oven for 20 mins. Allow to slightly cool for a few minutes. Then shove in face and sigh with bliss.
Hot chocolate volcano


Tuesday 15 May 2012

Vegetable Lasagna

Late last night, so late in fact that it was actually this morning, my sultry songstress friend and I were chatting on FB. Surprise surprise our topic of conversation was food. We spoke about failed cooking escapades. We were in stitches about her failed dhal curry that was super crunchy and about my very furry cow's tongue that was still covered in taste buds. I love a good laugh, even at my own expense.

The main chat then focused on lasagna, the vegetarian kind and we spoke about it for a bit and then I had to go to bed. One may ask "what is there to speak about lasagna?" ..... deconstruct one and think of each ingredient and you'll find there's a lot to speak about. Of course when I woke up in the morning the first thing on my mind was vegetarian lasagna. As soon as I dropped the kids to daycare I went to the supermarket and got what I needed then came home and went to my vegie patch and got the remaining items fresh from the ground. Any fresher is not possible. This is my take on a vegetarian lasagna.

Marie's Veg Lasagna

For the filling
1 x packet of store bought fresh lasagna sheets (of course you are more than welcome to make your own but I am burden by twins and a job most days so forget it, packet it is for me)
2 x large eggplants (or aubergines or brinjals, whatever you call it, same thing)
Fresh from the garden (most of it anyway)
2 x  red capsicums
quarter head of cauliflower
a small bunch of spinach
zuchinnis
a few cherry tomatoes for garnish
* basically you add whatever takes your fancy

For the tomato sauce
2 x cans peeled whole tomatoes
1 onion
3-4 cloves of garlic
a handful of basil
2 tablespoons of tomato puree
2 teaspoon sugar
salt and pepper

For the white cheesy sauce
4 tablespoons plain flour
2 tablespoon butter
2 1/2 cup milk
1 cup mozzarella cheese (I normally use parmesan but didn't have any)
big pinch of salt
about 1/2 a teaspoon nutmeg (maybe slightly more, taste as you go)

1. Roast capsicum by putting in hot oven or under hot grill until skin blisters and blackens. Or you could hold it (with thongs) over an open flame. Then place in sealed plastic bag as the steam helps separate the skin from the flesh. Then peel skin and discard. The flesh that you have now is pure flavour, packs a punch and sweet.
* This is a step that is worth the effort as roasting the capsicum does make a world of difference.
** or buy some already done for you from the shops

2. Slice eggplants and grill in oven until slightly cooked. If you prefer you may lightly fry it as well. You just want the cooking process to start and for the eggplant flesh to start to soften, you can cook it longer if you prefer but remember it will be cooked some more when it goes back in the oven later on.

3. Slice cauliflower thinly or make very small florets and blanch slightly. You don't have to if you like cauliflower with a bit of crunch.

rich and flavoursome
4. To make tomato sauce cook off onions and garlic and tomato puree. Add 2 cans of tomatoes, I like the whole peeled ones so I can break the flesh down and make the sauce chunky. Chop basil fine and along with sugar, salt and pepper throw in pot and allow to simmer for 20-30 minutes until flavours develop to what you like. You should get a strong tomato sauce with good acidity and a hint of sweetness coming through.


4. For bechamel sauce, in a saucepan melt butter and stir in flour. Cook it out for a few minutes or your sauce will taste doughy. Use a whisk and mix in milk a little at a time. Keep whisking until all lumps are gone and you are left with a smooth and thick white sauce. Add cheese, stir until melted and lastly add nutmeg.


5. To assemble simple layer everything together between sheets of lasagna. I started with tomato sauce, lasagna, eggplant, capsicum, zucchini, tomato sauce, white sauce, lasagna, eggplant, capsicum, cauliflower, spinach, tomato sauce, white sauce, lasagna, white sauce and I garnished with a few cherry tomatoes. Sprinkle with cheese if preferred but it's pretty cheesy enough I think.

6. Bake in 180 degrees oven for about 45-60 minutes.


Monday 14 May 2012

Smorgastata - The Birthday Cake for he who does not like sweet things.

Smorgastata
It takes all sorts of people in this world, I get that .. I may not understand all of them but variety is the spice of life after all. One particular breed of people I do not fully understand are those of the "I do not like sweet things" ilk. Yes, hard to imagine but they are out there. Stranger yet, I am married to one of them!!

My dear husband turns 4* today (best I do not reveal his age without permission) and although he does eat the odd sweet thing he really is a savoury man. I wanted to make him a nice birthday cake of some sort and was hurting my brain as to what to make when it hit me. He loves smoked fish, I love cake .... let's make a smokey fishy creamy cake!! That was when I remembered the Smorgastata.

A Smorgastata is a Swedish Sandwich Cake. If I make this sandwich cake it would become our meal and because it will look like a cake I'll pop a candle (or several dozen) and it'll also be the "cake" du jour. 2 birds 1 stone and all .. I'm all about multifunction!

My inspiration came from a recipe I saw on panini happy and like all recipes I want to try there will be adjustments and adaptations be it for the fact some items can't be found where I am or I like more of something or less of something else or for no real reason other than I just felt like it. Here is my offering of a Smorgastata.

Happy Birthday my darling Husband!!

1 rectangle Vienna loaf (go round if you prefer)
smoked salmon
cooked prawns
cucumber
pickled onions
gherkin
red capsicum
radishes
jarlsberg cheese
smoked trout or herring mousse (I didn't have any so I used smoked salmon and dill dip)
mayo
mustard
iceberg lettuce
cream cheese
sour cream
* basically anything you want
** do not season with salt as it will be salty enough
*** I did not write how much of each ingredient is required as being what is effectively a sandwich it really does depend on how much you want

1. Cut loaf of bread into 3 even layers, remove the crust.
2. Then all you need to do is basically layer the ingredients and make the biggest fishiest creamiest sandwich ever.
3. Make "icing"  for the cake by mixing cream cheese and sour cream to a consistency that is easy to ice a cake with.
4. Ice "cake" and garnish.
5. Attach candle, sing song to husband .... another year, another adventure.


Thursday 10 May 2012

Popping fun

I'm a mother to twin boys who are 2 and half years old. Very sweet and very naughty, and very everything else in between. Once a fortnight we attend a playgroup for multiple kids. It's an amazing circle of warm and welcoming ladies and their twins who have made my transition into a Multiple Mum a breeze. These wonderful ladies I am so very proud to say I can call friends now.

Whenever twingroup rolls around I'm always trying to think of what yummy treat I can make and bring as I love making and sharing anything scrumptious with this lot of superwomen. What I bake really does depend greatly on how much time I have to spare and that depends entirely on how well behaved the boys have been which in turn depends entirely on how well the planets are aligned, which direction the wind is blowing, if my tongue is held a certain way .... some days I can bake to my hearts content and other days I barely have time to scratch myself.

This particular day I wanted to make something fun and appealing to the kids but I just couldn't be bothered to do any actual baking. So I went on the internet and started looking at photos for things that had that instant wow factor but more importantly was easy to do. I found this blog and this no bake recipe for cookie pops and that was it, I was going to make my version of Mrs A In The Cove Cookie Pops.


Tim Tam Cookie pops

1 packet Original Tim Tams
100g cream cheese (softened)
1 packet white chocolate melts
1 packet of lollipop sticks (I only had 6 inches ones so I cut them in half)
whatever you want to sprinkle on cookie pops - I used coloured sugar and shredded coconut

1. In a food processor blitz the pack of Tim Tams andthen add cream cheese and blitz until all incorporated.

2. Use you hands and roll balls of chocolate mixture. Use lollipop stick and insert little holes in each ball in preparation for later. Freeze for an hour.

3. Melt the white chocolate over a double boiler. Take lollipop stick, dip end in melted chocolate and insert into hole of ball mixture. Then freeze again but only for a few minutes, enough to set the stick in the ball.

4. Dip whole ball into melted chocolate and place on lines tray. Whilst still wet add sprinkles of whatever you like but do it before chocolate sets so it stays in place or you'll be having coloured sugar and sprinkles and whatever else falling off the cookie pops.


Thank you Mrs A In The Cove


Monday 7 May 2012

The Skinny on dessert.

I have a friend who is in the entertainment industry. She is an amazing singer. This songstress is very petite and curvy and voluptuous, very va va voom. She works very hard to be healthy and vibrant and tries to eat well and exercise. A lot of her Facebook statuses are on her diets, her cleanses and detoxes, her exercise regimes followed by stunning photos of her looking radiant as obviously all that Zumba is paying off. I read them and think "I really should do what she's doing" and start feeling exhausted just from the thought of breaking a sweat and then proceed to cook up a storm.... that's my regime!

One day sultry songbird asked me if I knew of a dessert recipe that was less than 150 calories. Short of saying "Why don't you just lick my face as I'm sweet as hell" I thought for all the hardwork she's been putting in I can help by researching low cal desserts, testing out the recipe to see if low cal can equate to good taste and this is how this posting came about ... all in the name of research!

So after looking on the internet I found this gorgeous looking chocolate pudding. Normally when I find a recipe I want to try I do modify it somewhat but this recipe was borrowed straight from Eating Well website. The only thing I did differently was substituted the vanilla essence with peppermint. All the nutrition count and calorie count and whatever else health conscious recipes tend to count were already counted so all I did was made it and tasted it .... all together now .... all in the name of research!!

Long story short ..... if this is what low fat, low cal dessert can taste like ... bring it!! It's dark and rich and lush and taste like it's not low fat at all, delicious!!

Warm Chocolate Mint Pudding

1 large egg
2 1/4 cup low fat or no fat milk
2/3 cup caster sugar
2/3 cup cocoa powder (make sure it not the sweetened kind or you can kiss your calorie count goodbye)
1/8 teaspoon salt
2 tablespoon cornflour
1 teaspoon peppermint essence (or vanilla or coconut or almond or whatever your healthy self desires)


1. Combine 1 1/2 cups milk, 1/3 cup sugar and salt in a saucepan over medium heat and simmer, stirring occasionally.

2. Mix the remaining 1/3 cup sugar, cocoa and cornstarch in a medium bowl. Whisk in the remaining 3/4 cup milk until blended. Whisk the simmering milk mixture into the cocoa mixture. Pour the mixture back into the pan and bring to a simmer over medium heat, whisking constantly, until thickened and glossy, about 3 minutes. Remove from heat.

3. Lightly beat egg with a fork in a medium bowl.

4. Whisk about 1 cup of the hot cocoa mixture into the beaten egg. Return the egg mixture to the pan and cook over medium-low heat, whisking constantly, until steaming and thickened, about 2 minutes. (Do not boil.) Whisk in essence. Serve warm with fruit or a sprinkle of nuts ... or chill it.

ATTENTION 
* This recipe should yield about 6 serves or pudding at approximately 160 calories per serve.
** All I can say is THANK GOODNESS it's a low cal pudding because how on earth do you stop at just one serve???? TELL ME!!